
The Difference Between A Travel Charger and Travel Adapter
Do you know the difference between a travel charger and an adapter? Do you need both or just for your destination? Here’s a quick read to clarify what you need to stay power-upped and connected while away from home.
Travel Charger or Converter
A travel charger is also known as a converter. Typically, a travel charger or converter converts, that is steps down, the local electricity to a lower voltage. The US and Canada use lower voltage electricity than most parts of the world. The problem is if you plug in an appliance like your US hairdryer which is made for lower voltage into a higher voltage plug (even when using a plug adapter) it will send too high of an electrical current to your appliance. If this happens, you’ll “fry” your hairdryer or whatever other appliance you plugged in and ruin it, rendering it no longer useful.
Travel Adapter
A travel adapter makes it so that your device can plug into the outlet which has holes that are different than ours in the US. It does nothing more. You may only need a travel adapter. Many of today’s devices, like newer laptops and Apple products like iPhones and iPads, are dual voltage, so you don’t need a travel converter or charger to charge and use them in foreign countries. Most of the time, you will need just adapter plugs when traveling; however, in some cases, you may need a voltage converter (also known as a travel charger). One of the best tips you can follow is to buy your adapter plug and travel converter here before you travel internationally and take it with you.
Universal Travel Adapter/Converter
Read on to the bottom of the article, which explains what universal travel chargers and adapters are. Many savvy globe trotters pack a universal travel charger and adapter device as it’s an all-in-one device. If you’re not sure what you need, read on for a better understanding.
Electrical Appliances work at:
>110/120 volts = USA/Canada
>220/240 volts = Vast Majority of the Rest of the World
More About Converters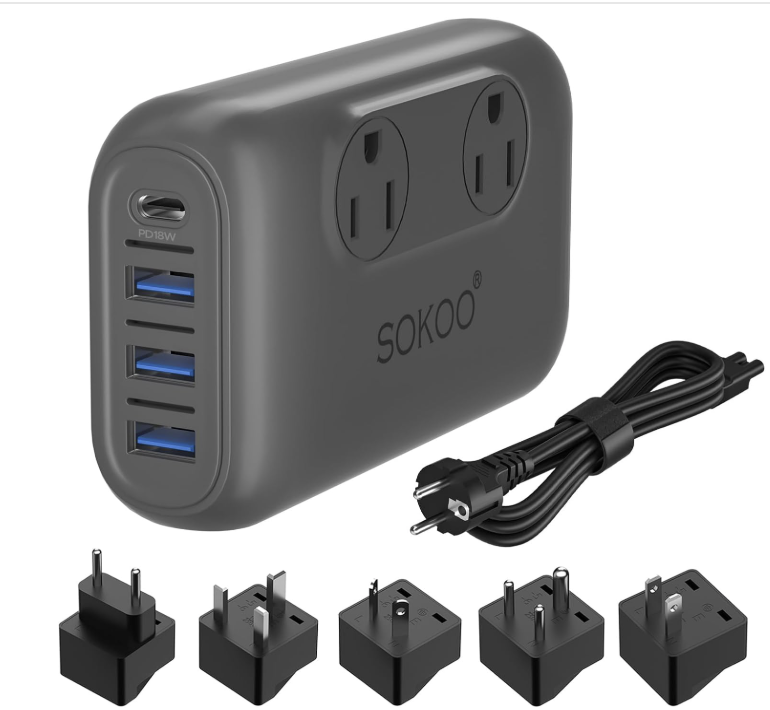
International Power Converter/Travel Adapter
Converters change the voltage from one level to another, usually from 220/240V to 110/120V. If your device only operates at 110/120volts (American devices) you will need a converter to step down (or convert) the power supply in your destination country for it to work safely. Your device must be plugged into a converter to change the voltage to avoid overheating or frying. For example, if you are traveling to France from the USA, your American curling iron will need a converter to step down the power voltage in France from 220/240V to 110/120V for the appliance to work.
Converters should only be used with electric appliances, such as hairdryers, irons, small fans, or any appliance that has a mechanical motor. If the appliance is electronic, which contains a computer chip, like a laptop, a converter is usually not required.
Many new electronics are designed to work at both 110 volts and 240 volts. Most devices that are intended for travel, devices such as laptops, cameras, cell phone chargers, and other battery chargers usually do not require a converter. Look for an indication panel on your electronics to verify what power level is compatible. If you’re not sure a quick inquiry to the manufacturer of the item you’re not sure about could save you from ruining your device.
We recommend checking the label and owner’s manual or contacting the manufacturer to be certain!
Is My Device Dual Voltage?
If the electrical appliance has a dual voltage (which means it can run on 110/120 volts or 220/240 volts), make sure the switch is on the correct voltage pertaining to your location. Some electrical items are made to operate at one voltage only. Most laptops, phones, and cameras, however, are dual voltage and don’t even require that you flip a switch. You just need a simple plug adapter to power them up.
Dual Voltage appliances will say 110-220 VAC, or INPUT AC120/240V 50-60Hz 1300W
Single Voltage appliances will say 110 VAC. 120 VAC or INPUT AC120Vac 60Hz 200W
Note: If your appliance is dual voltage, you do NOT have to worry about a converter. All you need is a plug adapter for the country you will be visiting. It is our recommendation if your appliance is not dual voltage and you depend on it buy one that is for travel.
Wattage
Wattage is the amount of power required to operate an electrical appliance or device. You need to know the wattage of the device in order to get the right converter. You want a converter that can handle the wattage required by the appliance plus about 25% more just to be sure. So read the specifications.
Most devices have a label showing the wattage. If the wattage is not listed on the label, the voltage and amperage are usually listed and can be used to figure out the wattage using a simple formula.
Multiply the voltage by the amperage (amps or A) to calculate the wattage. Example: An appliance labeled with a voltage of 110 and amperage of 1.5 is 165 watts (110 x 1.5 = 165 Watts)
Please Note: Converters are NOT meant for long-term use. Converters are meant to change the electrical voltage for small electrical items (such as hair dryers, irons, etc) for travelers for a short amount of time. We recommend no longer than 30 minutes.
Adapters
Adapters are simply connectors that change the plug shape to match the electrical outlet. Adapters allow you to use your device by connecting pieces of equipment that cannot be directly connected to the standard plug. They act as a go-between. You plug your device into the adapter and the adapter into the electrical socket. Throughout the world, there are about 15 types of electrical outlets so chances are that if you travel outside of the US you’ll need a plug adapter.
Adapters allow a dual-voltage appliance or a converter from one country to be plugged into the wall outlet of another country.
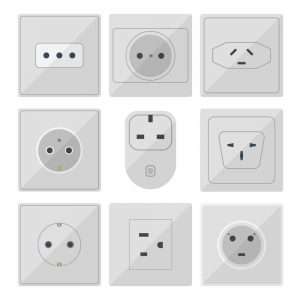 There are many different wall outlet shapes and configurations. Even if two countries operate on the same voltage, their electrical outlets might have a different shaped plug. Adapters will allow you to interchange the plugs, depending upon the outlets in various countries; however, they do NOT change the electrical voltage.
We highly suggest taking a variety of adapters when traveling because of how many different shaped plugs there are! An adapter kit or an all-in-one device that offers multiple plugs does not take up much room so it is best to buy one before you go. I keep my all-in-one charger and adapter unit, known as a universal adapter/converter, with my carry-on bag, so I’ll never forget to pack it.
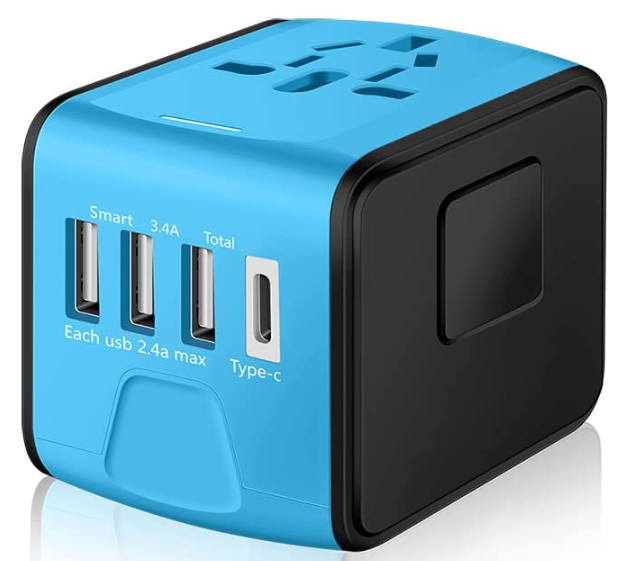
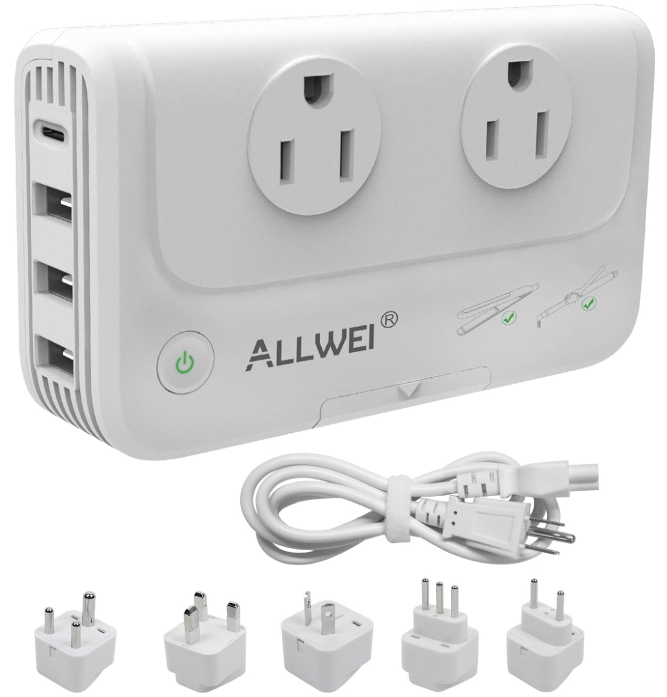
Universal Travel Adapter/Converters
A universal travel adapter/converter is an all-in-one device. It’s a travel charger and an adapter all in one. For most people, this is the best option to travel with because you’ll be prepared for whatever charging or electrical need you may have. These universal products handle both jobs and keep your tech gear powered up. These are our favorites from Amazon and all are competitively priced.
Travel Tips
- Pack travel adapters and phone chargers in your carry-on luggage. If your suitcase is lost, you will still be able to charge your cell phone &
camera. - Surprisingly, adapters are difficult to find in other countries. We recommend purchasing an adapter kit before traveling to keep your
electronics charged and ready for action! Research which adapters you may need based on electronics prior to your trip, so you have time to purchase
the right one. The best solution is to invest in a universal charger/converter device that converts the voltage and offers adapter plugs that fit most countries. - Bring an external battery for your phone in your carry-on luggage as well.
Articles You May Like